Tuesday, December 30, 2008

My BFF's


The fun thing about this time of the year is that my life long friends come into town, and we always try to get together. This year I had the girls (and their families) up to my place for dinner. Originally, I had visions of this great "martha stewart-esque" fancy pants dinner party. With all the skiing and playing we have done over the holidays, I couldn't even get my house clean! (you can faintly see my unmade bed in the upper left corner of the picture, I tried to cut it out as much as possible). So I went with one of my one pot wonders and a great salad, and had someone else bring a dessert. These are the girls I have known since the beginning and I love them to death! I made Bon Jon, which is a Iranian dish passed down from my Grandma who learned it as a young mother when she lived in Iran. It is one of my favorite dishes. Unfortunately for all of you, I am going to share the recipe next time. Today, I will share the recipe for the salad, which is all I have the energy for, when do the kids go back to school again?

Strawberry and Goat Cheese Salad w/ balsamic vinaigrette


This is a salad I invented after having a similar salad in Washington DC. 
Salad Ingredients:
Baby Spinach
Arugula
Romaine lettuce
Strawberries
Red Onions
Pomegranates
Sliced almonds
Soft Goat Cheese

Salad Dressing:
1/3 c balsamic vinegar
1/3 c sugar or honey
3/4 c olive oil
1/2 lemon squeezed
1 shallot
1 t salt

In your blender, combine shallot, honey, vinegar, salt. Blend until the shallot is fine blended. Add lemon juice. While blender is running, slowly add oil till emulsified. 

Putting together the salad. Slice the strawberries and onions as pretty as your little hands can do them, make them thin. Crumble the goat cheese (which can be messy, so crumble it right out of the fridge, it kind of has the consistency of cream cheese but a little harder) . Seed the pomegranates. Combine romaine, spinach and arugula (buy the pre-made mix bag).Toss with dressing, top with the rest of the ingredients. 
So pretty, so yummy.

This is Bon Jon, stay tuned I make it all the time!


Monday, December 29, 2008

Plenty to blog about, no pictures

Picture taken from my new Mac
So it was a great Christmas. and I have so much to blog about!  The biggest surprise was Fairb got me a new Mac for Christmas! Every time I sat down on his computer (to do my blog usually) he would complain and tell me to use my own computer. Well my computer is always having problems and when its not having problems, little Evie is on there playing scooby-doo on it. So when he complains, I would respond, "I'll get off, when you get me a Mac!" So he actually did it, and surprised me Christmas morning. I was shocked, we have a long standing tradition of NOT getting each other anything for Christmas, so if was definitely a surprise. What was more shocking, he actually wrapped it! What a sweetheart. So I am excited to explore my new Mac. I have always been a PC user, but the mac has been calling my name for the last couple of years. So I still have some learning to do.
I can not blog about food until I get a memory card reader for my computer. I have to live up to my promise and not sit on Fairb's computer. So I will put that on the to do list. Because the recipes are overflowing!

Sunday, December 28, 2008

Will I ever recover?

I am pooped! Way too much playing over this holiday season! I need to get back to cooking, just let me take a nap and I will recap this holiday food season . . .

Sunday, December 21, 2008

scones for sledding


Yesterday we had the crew up for a sledding party. It was 18 degrees outside and the children stayed outside for hours, riding the hill just off our deck. My son's cheeks were so rosy for hours after he came inside, I checked his temperature just to see if it was because of a fever! However, we did lure the kids inside with hot chocolate, chili and scones.

This is a buttermilk scone taught to me by my dear friend Becky. It is easy and it is good!

Buttermilk scones (fry bread, sopapia whatever you want to call it!)

4 c buttermilk
8 c flour
3 T oil
7 T sugar
1/2 t baking soda
3 t baking powder
2 T yeast
3/4 c warm water
So my friend Becky is old school, she is all about the glass bowl and wooden spoon when she does dough. She has a kitchen aid that still sits in the box in her basement. So she would do all this by hand, but I however am a slave to the dough hook. So I will post how I did it in the kitchen aid.

Dissolve the yeast and 1 T of the sugar in the warm water. Combine the remaining sugar, baking soda, and baking powder with half of the flour. Mix together. Next add oil, yeast mixture and buttermilk and combine with the paddle attachment. Switch to the dough hook and begin adding the remaining flour, one cup at a time until all the flour is added and continue to knead until the dough is smooth. As always, I like to do the final kneading with my hands. Doing the final hand knead lets you get familiar with what good dough is supposed to be like, and will improve you bread making skills. Plus, it is so fun to put your hands in dough, I can't resist it! Spray your bowl with pam and return the to dough to it. Cover it and let it rise in a warm spot. Let it rise till almost triple if you can wait that long.It should get huge. Now Becky rolls hers out cuts them into perfect shapes, lets them rise a little and then fries them. I did that the first time, but last night, I just tore a piece off, stretched it out and fried it. Either way is good, the first producing a nicer scone, but not by much. It should also be noted that it is not a mistake that salt is not in the recipe, the buttermilk compensates for that.
I have a deep fat fryer, but you can heat about 4 inches of vegetable oil on the stove. It hot enough when you drop your dough in the oil it sinks to the bottom then floats to the top, if its really slow to float to the top, not hot enough, floats up really really fast, too hot.
Thank goodness winter is here, but scones and chili just aren't as good without snow and sledding.


note: my husband and children made it the whole night in the tent on the deck. I couldn't believe it, I woke up with no children next to me and I hod to go outside and make sure they weren't all frozen to death. They were all cozy warm curled around their dad like little puppies.

Friday, December 19, 2008

New Christmas tradition


So my husband fairb who normally is the resident "bah humbug" has been a little more in holiday spirit this year, he hasn't bemoaned Christmas music and has even turned it on without me even asking. Tonight he stated he wanted to start his own "Christmas Tradition".
"From now on, 6 days before Christmas, we are going to sleep outside in a tent!"

I tried to talk him out of it, I really did. Why put yourself through that
misery. The children were sold instantly. So I allowed it, but I warned them
that I would not pity their misery, and I would not nurse their grumpy spirits
in the morning. I'll let you know how long they make it tomorrow!

Need something to go with you Christmas Prime Rib?

Twice Baked Potatoes
So for the big Christmas Party I am going to make twice baked potatoes to go with the prime rib(I'll talk about about Prime Rib tomorrow, but here's a heads up, kitchen tool of the week is a digital thermometer) . What is great about a twice baked potato is that first, it is fancier than a regular baked potato. Second, imagine for my sister-in-law Krista or my sister Lisa who both have a million children, them not having to help all of the children " fix" their potato because it is already done. Third, it can be done in advance, and that my friends is a great thing.

Step one: Bake the potatoes, but first do the math. For every 2 potatoes (I am talking the big bakers, costco style, because you know that's the only way I roll) , you will get 3 twice bakers. So you have twelve people coming to dinner? Ask your son to do the math for you. (Man, I had to pull out the pen and paper for this one, you have to do 8 potatoes) Scrub the potatoes good, and just place them right on the rack at 400 degrees till you can puncture them with a fork easily, about 1 to 1 1/2 hours.

Step two: Pull them out of the oven, and while they are still hot, hold them with a hot pad and cut them in half


Step three: scoop out the insides carefully to leave a nice potato skin boat, and run the potatoes through your ricer (or you can just mash them if you don't have a ricer) and into a big mixing bowl.

Step four: Time to add more ingredients. Now the amounts of ingredients, depends on how many potatoes you are doing. Just imagine you are fixing a ginormous potato. The ingredients are, sour cream, cheese, season salt (I use lowrys) and course ground pepper, also a little milk. Be liberal on the cheese and sour cream, start conservative on the salt and pepper, mix, taste and decide if it needs more. When I made them the other night, I didn't have chives, but if I had them on hand I would add fresh chives as well. You could add other spices as well, but I don't think you need anything else, this way is simple and pleasing. You could add fresh garlic if you are a big garlic fan, but it would be easy to go over board. Don't want to screw anything up? Stick to the s and p. You want the consistency to be thick and drier than classic mashed potatoes, so keep that in mind when you are adding milk.


Step five: Spoon the mixture back into the potato skins, like I said before, you will not use all of the skins, so you want to make your skins over flowing. Sprinkle a little paprika over the top.

Step six: Bake again at 350 degrees for about 20-30 minutes. They should be browned, but when you touch them you can tell that the insides are soft and creamy.


You can prep the potatoes up to a day before and keep them in the refrigerator until you are ready to bake them, if you put them straight in the oven from the fridge, they will take about 10-15 minutes longer to re-bake.

Tuesday, December 16, 2008

fancy pants dessert


Creme brulee is one of my favorite desserts of all time. So for the big Pope family Christmas party I decided to make it. However, I have only made it once or twice before, so I wanted to do a little run through today. So like the past times I have made creme brulee, I have just googled "creme brulee recipe" and took the recipe at the top of the list. Today that was Alton Brown's recipe (I have learned a lot watching Alton Brown, he is however kind of annoying, but I like him). A creme brulee is a baked custard that you give a hard, caramelized top to by "bruleeing" (I don't think that is word). However, now that I have used his recipe a couple times this is how I altered it to get the best results for me, however I recommend reading through his recipe.

Ingredient list
1 quart heavy cream
7 egg yolks
2/3 c sugar (plus more to top the custard and caramelize)
1 vanilla bean split and scraped (or you could used 1 1/2 t vanilla extract)


Mixing the eggs and sugar together so it looks like the prettiest yellow.

Meanwhile place the vanilla "scrapes" into the cream and heat the cream on the stove till bubbles form around the edges. Time to temper the egg mixture. Add one ladle full of hot cream into the eggs SLOWLY while violently whisking. Continue to slowly add the cream till it is all incorporated. Before dividing among the ramekins, run through a sieve to make sure there are no scrambles. Divide among 7 ramekins. Meanwhile get some water boiling.

Because you have to bake them in water, this is where the deeper ramekins prove useful. Notice my pan has handles, very very useful. The boiling water should go half way up the sides of the dishes.

This is what it looks like after its been baked.


Add a thin layer of sugar.


This is my torch, its not one of those torches from Bed Bath and Beyond that are a rip off, this is what I use to light my fireplace and I got it at home depot for like 20 bucks and it lasts forever!

Begin torching, don't get too close, and remember the ramekin will be hot, don't burn yourself!


Impress your relatives this Christmas, or charge them 7 bucks a piece, that's what Carrabba's does right?


restir fry


Remember my stir fry? It makes the best "left overs" lunch ever! Don't you dare warm it up in the microwave! Get out a frying pan and just "restir fry"!

Monday, December 15, 2008

It's begining to look a lot like Christmas . . . Finally!

No time for cooking tonight, we had to gear up to play in the first significant snow fall! Step 1-- find all the snow gear, including two matching snow boots and two matching snow gloves (times 3 of course). Step 2-- get everyone in their snow gear quick enough so that the first one dressed doesn't start crying and want to take everything off because its "itchy" before he gets outside. Step 3-- Open the door and let them out running behind them with the camera with no coat on and slippers so you an get the fresh snow pictures. Step 4-- Run back inside and get your own snow gear on so you can join in on the fun. Step 5-- come in before the children so you can lure them back inside with hot chocolate. And that my friends is how you enjoy the first real snow of the year!


This summer my husband just had to put up these enormous, light the yard up like a stadium, flood lights on our house. When I saw them I was mortified, are these really necessary fairb? Tonight we turned them on for the first snow and I take all my criticism of the flood lights back. Good on ya' fairb. I love the lights.

I also love hot chocolate, and so do the children. No marshmallows here, just tons and tons of whipped cream!


Sunday, December 14, 2008

What to get the cook in your life? KITCHEN TOOL OF THE WEEK!


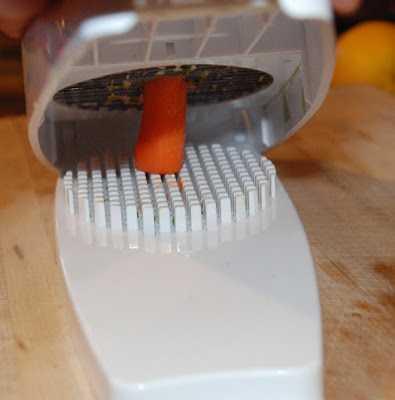
The Genius Nice Dicer!
It slices! it dices! it . . . . actually it only dices.

Yes, this is a 'As seen on TV" thing. However, I did not buy this on QVC at 3am. My mother gave it to me, and it is one of my most favorite tools in the world. I have seen them in stores before, however I have seen (and tried) similar concepts in stores. This one is the best. Trust me, I have used other dicers, and this one works way better. I use it a lot, and I used it for the bellow stir fry recipe. So go get yourself one and put it under the Christmas Tree. Man, I should be on infomercials!


Stir Fry Dinner

Healthy, yummy vegetables . . . .mmmmmmm.....

I cooked a stir fry today for Sunday Dinner. Stir fry for Sunday dinner doesn't seem right. I felt like the mother in "The Christmas Story" when they had to go the Chinese Restaurant on Christmas Day when the hounds got her turkey. Sunday dinner should involve some sort of potato right? However, a beef stir fry is one of my top favorites, and all the grandparents were out of town, so it was just me and the family. This is simple and healthy.

Ingredients:

Thin sliced steak
1/4 c soy sauce
1/4 c rice wine vinegar
2 T oil
1 t hot chili sauce (or rooster sauce, see picture)
2 garlic cloves minced
2 T dried onions or green onions

Add all the above ingredients together and allow the meat to marinade for about 30 minutes (not in the fridge, on the counter you want the meat to come to room temp)

Get some water boiling to cook some THIN spaghetti noodles (you got to get thin!) If I were to measure how much to use, clench a diameter's worth that would be the same circumference of a 50 piece. Rinse the noodles once they are done and set aside.

While your noodles are boiling, cut up whatever veggies you want for your stir fry, but you cannot neglect a yellow onion and 2 garlic cloves minced, they are important. I like, red pepper, carrots, mushrooms, zucchini, broccoli, cabbage, bean sprouts, shelled edamae (you can buy frozen shelled edamae at Smith's).

You need two pans, one to cook the meat on and one to stir fry my veggies. I used my stove top griddle for the meat, and my wok for the veggies. For the meat you don't want it be crowded, so if you don't have a stove top griddle, use you largest frying pan. Get both pans smoking hot! Add about2 T of vegetable oil to both. Make sure the pans are really hot (notice I said it twice? its important) so when you add the vegetables it kind of makes you fear for your life it sizzles so loud. Give everything a toss, and cover with the lid. Put the meat on (pulling it out of any extra liquid), spread it around in the pan. Back to the veggies, lift the lid and give them another toss or two, and cover again. Back to the meat; move it around flip and such, and back the veggies for another toss. By this time the meat should be pretty dang close to being done, so remove from the hot stove and onto a plate. Check your veggies again, how do they look? Starting to cook. Remember, you want them tender crisp! Once they are at the beginning stages of tender crisp, add the meat and the noodles. Now some seasonings, add 1/4 c soy sauce, and 3 to 4 T of oyster flavored sauce (don't be scared, it doesn't taste like oysters, although I love oysters!) Now let me note, its not like I am measuring all this, I just PUT stuff in. So you have to taste it and say, "hmmm, still needs something . . ." Serve it with rice, steamed edamae, and some rooster sauce (for those who want to add a little spice) and it will be loved, I guarantee it.


Friday, December 12, 2008

Christmas Traditions: Part II

This tradition is too hard for my children to wait for all year long and it insures their good behavior during the holiday season. It works way better than, "Santa's elves are watching . . . ." It is the advent calendar that counts the days down to Christmas (I got a new one this year, this one is from Target) . Every day I put a note inside with a clue, the clue directs them to a small (under a dollar) prize. Now I have learned that instead of letting them do it first thing in the morning, I don't do it until later, after chores and reading are done. They love it to pieces and look forward to it with all their little hearts!
Running for the Clue
Obtaining the Clue


Reading the Clue


Running for the prize

Finding the prize

Relishing in the prize


Showing the Prize

Thursday, December 11, 2008

I am going to steal this idea and claim it as my own

I went to my Dad's company Christmas party last night at UVU and this was my dessert. It was a lemon cheese cake on a shortbread cookie, a raspberry sauce and a little meringue flower. It was really good, and so pretty! I am totally going to copy it and master it, stay tuned . . . . Sorry UVU, but what I can say for you is that you cater much better than BYU, sorry BYU.

Wednesday, December 10, 2008

Whole wheat bread


Nothing makes you feel more like a pioneer woman than grinding your own wheat to make some bread. If you really want to feel like a self reliant woman of Zion, get yourself elbow deep in bread dough, it is a good feeling!
My mother made bread often, but this recipe was taught to me by my friend Lori (yes the pie goddess) my mother must hate her. To give my mother credit, I learned ALMOST everything I know from her.

Ingredients:
1 c warm water
2 T yeast
2 t sugar
Add sugar and yeast to warm water, and proof until dissolved and foamy.


4 c whole wheat flour
1/2 c vital wheat gluten
3/4 c dry milk
2 1/2 t salt


Mix together dry ingredients in a stand mixer (kitchen aid). Next add. . . .


1/2 c oil
3 c warm water
1/2 c honey
yeast mixture

Mix this together with paddle attachment to make a "batter".


Let this sit for about 15 minutes till bubbles start to form on the surface. Switch to the dough hook.

Now it is time to start adding more flour. Add one cup whole wheat flour. Turn the kitchen aid to 4 speed. Once the flour in incorporated, ( it should be really sticky) scrape down the sides with a rubber scraper and add 1 more c of flour. One incorporated, scrape down the sides again. Keep the speed on 4 and keep adding flour 1/4 c at a time till the dough forms a ball and stops sticking to the sides. The goal is not add too much flour. Keep kneading, if the dough starts to stick to the sides again, add a little bit more flour. As soon as it has the right amount of flour, I like to take it out of the bowl and knead it by hand. I just love to put my fingers into dough! Although you can continue to knead it with the mixer. Knead till the dough is smooth and "pillow like"

Form the dough into a pretty ball. Spray the same mixing bowl with pam and place the dough inside.


Cover dough with a towel and let raise until double (about 30 minutes)

Punch down.


Let rise again for about 15 minutes


Divide into three parts and shape into loaves. Spray bread pans before putting the dough in.

Let raise till it grows an inch above the rime (about 1 hour) Heat oven to 400 degrees, put in loaves and turn it down to 350. Cook for 30 minutes. As soon as you pull it out of the oven rub a stick of butter over the tops.

Tips:
I used hard white wheat from Lehi Roller Mills (costco) and ground it myself. I have a Vitamix Blender with a grain grinding container, so that is how I grind wheat. Some prefer red wheat, (like my mom) I prefer white because kids like it better, it is more "white bread" looking.

Your oven is the prefect place to raise dough. Turn the oven on for like 1 minute to get some heat in it then turn it off and put your dough inside.
Measure the honey along with the water. Meaning measure a 1 1/2 water then add honey to the water to make 2 cups. That's the easiest way to measure the honey.